

Questions & Answers about Shade Sail Installation Guide
Currently there are no questions that have been asked or answered on this product.
Ask a Question about Shade Sails - Installation / Guide / Install Tips.
We will use your email to send you a reply, when answered, and will not share it with any third parties. All submitted questions are reviewed for relevance, value and we may not publish questions that are already answered, off-topic, or deemed unhelpful to our community.
Shade Sails Installation Product Reviews
Currently there are no Product Reviews at this time.
Shade Sail Installation Guide Tips on How to Plan for your Sun Sails
Sail Structure Designs and Layout

Shade Sails can be "flown" (mounted) in a variety of ways:
- Horizontally (flat), where all corners are at the same height;
- Vertically, like a privacy fence;
- Slants & Angles with overlapping sails;
- Or, where some corners are high and some low, like the Hypar Twist effect to the right.
A horizontal, flat sail can be boring to look at, while a totally vertical sail could catch wind more often and could produce heavier loads. The most visually appealing situation is when two or more shade sails are used and the mounting elevations of the sails change dramatically from corner to corner. Setting mounting points 3ft or more change in height makes for a visually stunning look.
Prior to installation, check with local authorities for any relevant building regulations which may exist, and check with the local utility companies for any underground services prior to digging footer holes for any support posts.
Shade Sail Placement
Before you start your installation, it is very important that you consider the most suitable location for your shade sails. Take into account the following:
- Size of the shade sail(s) and the expected worst case force it could exert on the mounting points;
- Strength of existing structures intended to be anchor points;
- Ability to insert suitable fixing posts;
- Location of barbecue grills, fire pits, and other high heat sources;
- Sun direction and path tracking;
- The ability to create at least 18 inches or more spacing between any overlapping shades to prevent rubbing or chafing damage.
- Wind speeds typical and maximum expected for your area.(90mph is possible anywhere in the USA/Canada at least once a year)
Note: Shade sails should not be used near an open flame. Do not use your barbecue under the shade structure. Heat and chemicals in the fumes from a flame can both effect the longevity of the sail fabric.
There could also be other factors specific to your situation which require consideration.
In determining the location for your shade sail, it is important to keep in mind the movement of the sun across the sky throughout the day. The shade shadow of the sail will, of course, move as the sun moves. As a result, you will only have shade directly under the shade sail at midday during mid-summer.
Once you have identified the location for your shade sail, it is important to determine the most suitable mounting points for the corners.

240 inches represents the Anchor Point Dimensions and the 218 inches is the reduced Finished Sail Dimensions
Some of these mounting points may already exist -- for example, a pergola, large tree or branch (minimum 10in diameter), fence post, soffit, fascia or wall. If enough fixing points are not already available, posts may need to be installed. On each side of the sail, you should allow a space between the corner of the shade sail and the anchor point that allows for fabric stretch plus any tensioning hardware or mounting. For example, if one side of the shade sail has a length of 240 inches, allow enough room for the tensioning turnbuckles (ours are 8.5-11 inches) and for fabric stretch (~5% of what is left) of space between the corner of the shade sail and the mounting point. This should be done for each side of the shade sail to ensure there is adequate room to tension the sail properly event when the fabric has fully stretched.
This stage of the installation is critical. You should ensure all fixing points are structurally sound, and, if you are unsure, obtain independent advice from a builder or engineer. Or call us, we have been doing this for over 22 years!
Local Building Codes for Shade Sails
Prior to installation, check with local authorities for any relevant building codes or permits that may be required, especially if you live in a neighborhood with a Home Owners Association, or you are planning to install them in a public / commercial environment like a park, recreational play area, Daycare or the like. Many areas of the country, like Florida and California, have specific code requirements for shade sails.
Mounting Hardware for Sun Sails
There is an extensive range of fixing accessories available to help you secure your shade sails. These accessories are readily available from your hardware supplier.

Chain, wire, or thick, strong non-stretching rope can be used to extend your shade sail corner to a fixing point several inches or many feet away if needed.
Shade Sail Attachment & Tensioning Ideas |
||
|---|---|---|

Spring Clip Connector |

Turnbuckle Shade Sail Connector |

Chain Extensions |
Attaching Sun Sail To Fascia

If you intend to secure your shade sails to the fascia, the use of a reinforced fascia supports is strongly recommended. The fascia support is used to connect the overhangs of rafters or trusses to fascias ledgers giving a stronger connection between the two. Always make sure the fascia have been reinforced up on the back side and attached to the rafters within 2-3 feet either side of the attachment point. With sails larger than 150 sqft, you should make sure the rafters have been secured with screws, and not just nails to the tops of the walls. Use of 4x4s or 4x6s, L-Brackets, long screws, or Simpson strong ties/hurricane hangers can be used in some combination to do this.

|
Post Supports for Mounting Sails

If additional posts are required, we recommend the use of a minimum of 4 inch, schedule 40 steel pipe or a minimum of 6x6 inch wood treated for outdoors. Posts sizes are determinied by the size of the sail or sails attached to it, what sides they are attached and the height they are attached. Your local timber supplier or pipe fabricatore can assist you in your sizing. Post lengths should be taken into account the proposed height of your sail plus the depth of your footings. Footing depth should be 1/2 the length of the exposed pole. For example, if your post height is to be 10 feet, you would use a 15 foot long post with a footing depth of 5 feet in the ground.
The wood post to the right has landscaping nails driven into it in the areas that will be filled with concrete. Wood shrinks when it looses moisture over time. The landscaping nails hold the wood to the cement even it is does shrink.
Shade Sail Post Footings |
|
|---|---|

|
Measure out centers of footing positions and mark as illustrated. Dig holes at least 12 inches around the post and to the depth required by the post height as described above. |
Steel Shade Sail Post Footing |
|

|
Lay a 4 inch (100mm) depth of 3/4 inch diameter gravel at the base of the hole. Next, pour a 4 inch (100mrn) depth of concrete to provide a solid pad. Patio stones can be substituted in place of the poured concrete. Insert the post with a hold down bolt through the post to keep it secure. (see diagram) Pour the concrete footing and temporarily brace the posts until the concrete has set. |
Wood Shade Sail Post Footing |
|

|
Lay a 4 inch (100mm) depth of 3/4 inch diameter gravel at the base of the post. Insert the posts using lag bolts partially driven into the post to hold it in place. Use string lines to ensure they are in plumb alignment. Brace the post until the concrete has set. |
Securing Sail Posts

Mix concrete in line with the pakage instructions. These will be labeled clearly on the packet. Your supplier will be able to give you any special advice you may require for your own conditions. Pour concrete to the top of the holes ensuring it is packed well. Ensure the concrete surface is sloping away from the posts to assist water drainage. Allow poles to set in concrete for a minimum of 48 hours. Brace if required.
Sail Attachment Points
Connect fixing accessories to mounting points as required. Ensure all connections face towards the middle of the sail and are tightly secured. Check again to ensure all mounting points are solid.
Lay your shade sail out on ground where it will shade, and commence to attach each corner to a fixing point loosely.
Tension the Sail Shade Fabric

A properly mounted and tensioned shade sail will have approximately 150 pounds of tension on it and will have little to no wrinkles. Most installations have the 1st corner is directly connected to the anchor point. Continue to connect the other points by stretching the corners tightly and attach. Use a rachet strap is generally recommended to give majority of its initial tension. Use of one or more turnbuckles, depending the sail shape, to add/adjust tension to minimize wrinkles. Stop tensioning when the shade sail shows no sag in the middle and has few or no wrinkles/creases. DO NOT over tension the sail.. Tension only by hand and only tight enough to remove the wrinkles out of the shade cloth. Re-tension periodically when required.
The last corner of any sail will be the challenge. Use of a rope and a friend, or a 1 inch webbing (Rachet Strap) with a winch, bring the last corner of sail as close to its attachment point as possible and put the last attachment hardware in place. Now look at sail to see if there are any wrinkles. Wrinkles usually occur between two corners where they are tighter than the other corners. Tighten the turnbuckles on the other corners to reduce and eliminate the wrinkles.

Tension Required |

Tension Correct |
Shade Sail Care & Cleaning
Most sun sails made of HDPE material (like Commercial 95, Coolaroo, Shade Logic or PolyFab materials) can be routinely cleaned with a hose spray on Jet setting. Other materials like Sunbrella should be taken down and softly scrubbed with a sponge or soft brush using a solution of mild detergent and water. Let the solution stand on the fabric for 10 minutes and rinse thoroughly with water from your garden hose.
DO NOT put the fabric in your washing machine, clothes drier, or scrub it with a stiff brush, scouring pad, or an abrasive cleaner.
Your shade sail is designed to provide UV protection and comfort in domestic areas. When selecting the position for your shade sail, ensure all fixing points are structurally sound and fixings are tightly secured. Inspect regularly. Prior to installing, consult your local council regarding building regulations which may apply in your area. Exposure to certain chemicals, e.g. Chlorine, can lead to the premature breakdown of the fabric. Chemicals to be used on or around the fabric should be referred to BackyardCity.com prior to their use.
DO NOT have fire or an open flame close to the fabric.
DO NOT use your barbecue under the shade structure.
The above is intended as our guide only and not the actual instructions for installing your specific shade sail(s). Please read and follow the instructions of the manufacturer as it pertains to their particular shade sail.
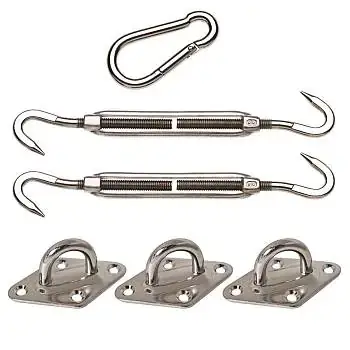 Mounting Hardware Pack - Triangle Sun Shade Sail
Price: $43.99Sale Price: $34.95
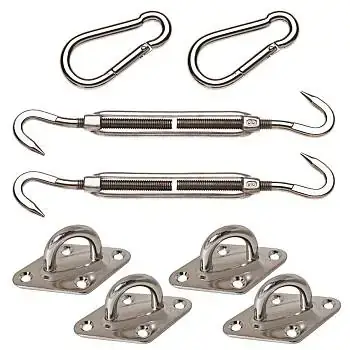 Mounting Hardware 4-Corner Sun Shade Sail
Price: $69.99Sale Price: $44.95
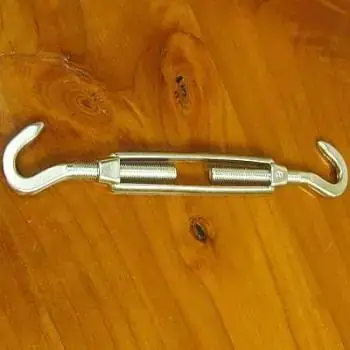 Hook - Hook Sailshade Tensioning Turnbuckle
Price: $29.95Sale Price: $17.95
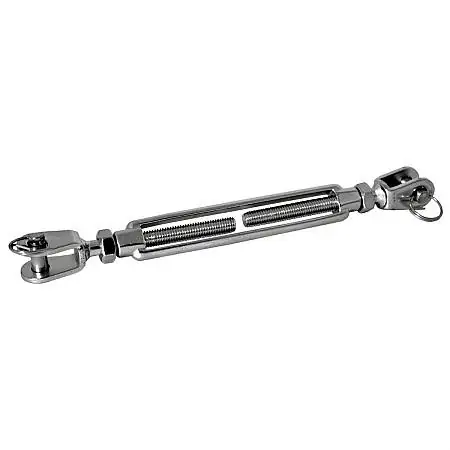 Jaw - Jaw Sailshade Turnbuckle Stainless Steel
Price: $36.95Sale Price: $19.95
Related Products
Last Updated: 06/18/2026 03:14 AM - ID:649